Stable Diffusion: What Are LoRA Models and How to Use Them?
Stable Diffusion has taken over the world, allowing anyone to generate AI-powered art for free. However, if you have ever wanted to generate an image of a well-known character, concept, or using a specific style, you might've been disappointed with the results. It's common that Stable Diffusion's powerful AI doesn't do a good job at bringing characters and styles to life by itself. Luckily, LoRA models can help with this problem.
With so many amazing extensions and models available to enhance Stable Diffusion, it's no surprise that the LoRA model is so popular. But what does a LoRA model really do? How can you use it to make your art even more spectacular?
In this beginner's guide, we explore what LoRA models are, where to find them, and how to use them in Automatic1111's web GUI, along with a few demos of LoRA models.
Table of Contents- What is LoRA?
- LoRA Model Types
- Where to Find and Download LoRA Models
- How to Install a LoRA Model Into Automatic1111
- How to Use LoRA Models in Automatic1111
What is LoRA?
LoRA stands for Low-Rank Adaptation. It allows you to use low-rank adaptation technology to quickly fine-tune diffusion models. To put it in simple terms, the LoRA training model makes it easier to train Stable Diffusion on different concepts, such as characters or a specific style. These trained models then can be exported and used by others in their own generations.
Stable Diffusion models have been gaining popularity in the field of machine learning for their ability to generate high-quality images and text. However, one major drawback of these models is their large file size, making it difficult for users to maintain a collection on their personal computers. This is where LoRA comes in as a training technique to fine-tune Stable Diffusion models while maintaining manageable file sizes.
LoRA models are small Stable Diffusion models that apply smaller changes to standard checkpoint models, resulting in a reduced file size of 2-500 MBs, much smaller than checkpoint files. LoRA offers a good trade-off between file size and training power, making them an attractive solution for users who have an extensive collection of models.
LoRA Model Types
We can categorize LoRA models into a few different types:
Character LoRA
A model trained on a specific character, such as a cartoon or video game character. Character LoRA is able to accurately recreate the look and feel of a character, as well as any key features associated with them. This is the most common type of LoRA, as generating characters without this training data is often tricky and inconsistent.
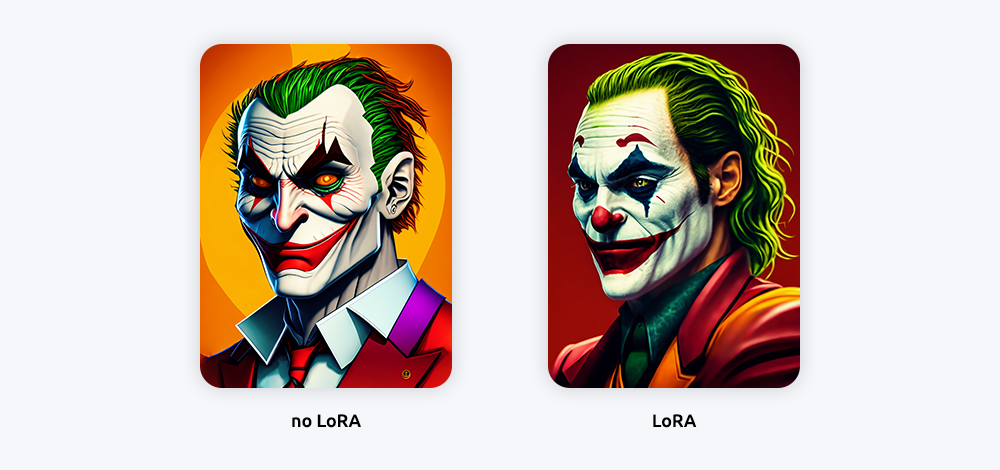
- Model used: Dreamlike Diffusion 1.0
- LoRA used: The Joker | Photorealistic
- Prompt used: portrait of the joker, high quality, 8k
Applying a character LoRA allows you to quickly generate characters with an authentic look, making them perfect for AI illustrations, character concept art, and even reference sheets. Depending on the training of the model, the character might be fitted to an outfit, a specific hairstyle, or even a certain facial expression. However, some character LoRA makes it possible to put your chosen character into new outfits and settings, giving them an added level of charm.
Character LoRA exists for all sorts of media, including popular and lesser known titles. You'll find characters from popular franchises like Super Mario, Marvel, and Pokémon, as well as numerous Japanese anime characters and even comic book heroes.
Of course, character LoRA can also be applied to original characters, as long as there's sufficient training data. While experiments with low training data are ongoing, it's better to create character LoRA with at least 10-20 different images. This will add variety to your training process, improving the quality of the generated characters.
Style LoRA
Style LoRA shares many similarities with character LoRA, but instead of training on a specific character or object, it focuses on an artistic style. This type of model is usually trained on art by a specific artist, giving you access to their signature style in your own work. Style LoRA can be used for anything from stylizing reference images to creating original artwork in that same style.
As the name suggests, these models are trained on specific styles, like the specific look of an animated show, watercolor paintings, lineart, and more. With this type of LoRA model you can easily give your AI artwork a unique style that stands out from the crowd!
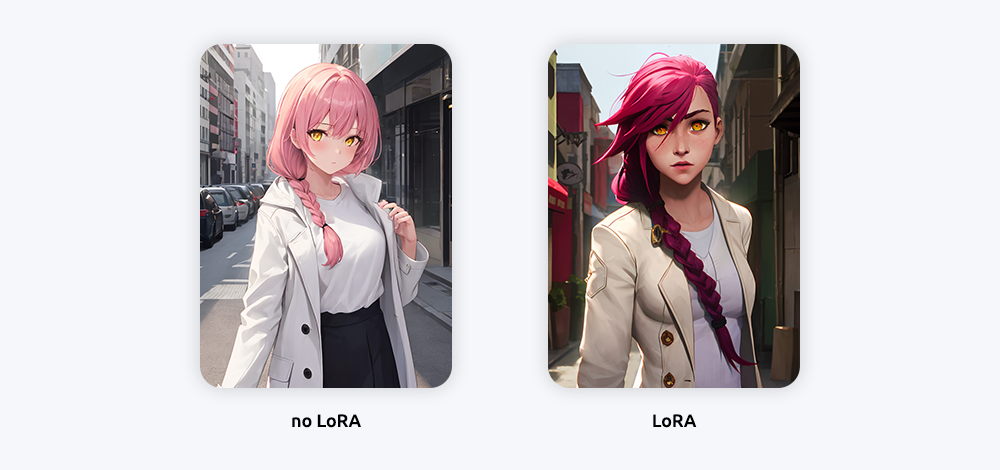
- Model used: AnyLoRA - Checkpoint
- LoRA used: Arcane Style LoRA
- Prompt used: arcane style, 1girl, pink hair, long hair, one braid, white shirt, coat, yellow eyes, looking at viewer, city street
We generated a new piece of AI artwork using a LoRA model trained on the style of the Netflix show Arcane. The model was able to capture the show's vibrant colors and distinctive character designs on a character that doesn't appear in the original show.
What's great about style LoRAs is that they work together with regular Stable Diffusion checkpoints, allowing you to create amazing and unique pieces without having to merge large models. For example, using a realism checkpoint and a painting style LoRA will produce a realistic image that looks like it was painted.
Concept LoRA
Concept LoRA is a special kind of LoRA that was trained on a specific concept or idea. These models usually aim to conceptualize something specific that'd be harder to achieve with simply just prompt engineering. For example, this type of LoRA could be trained on a specific emotion, action, or a very specific item.
This type of model is particularly helpful when you're trying to create original artwork that conveys a specific concept. For example, if you wanted to generate an image of a glass sculpture, you could use a concept LoRA trained on that exact idea. The result would be a unique and interesting piece of art that clearly conveys the concept you were aiming for.

- Model used: Dreamlike Diffusion 1.0
- LoRA used: Glass Sculptures
- Prompt used: ballerina, dancing, translucent, glass sculpture, reflection
Concept LoRAs make it easier to create artwork that is both stylized and conceptually strong. They are also great for creating smaller, more obscure pieces which would be hard to generate with other models. As such, they can often give your artwork an extra edge in terms of uniqueness and artistic value.
Pose LoRA
Applying a pose LoRA to your generation does exactly what it sounds like - it's going to pose your character in a certain way. This is great for generating dynamic scenes, where you can produce specific poses and actions that are just often hard or impossible with regular prompt engineering.
Pose LoRA models focus more on the pose of said character rather than its style or features. For example, if you were to apply a pose LoRA model to a humanoid character, it would create different poses for them such as running, jumping or sitting, but it wouldn't change their features, clothing, or alter the style of the model you're using.
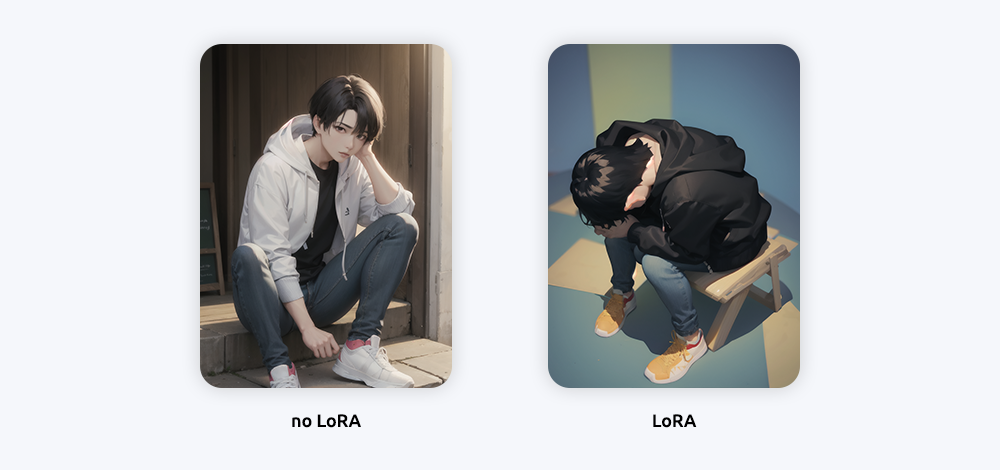
- Model used: GhostMix
- LoRA used: Shinji in a Chair | Meme
- Prompt used: solo, male focus, sitting, head down, short black hair, hooded jacket, jeans, sneakers
Pose LoRAs are a great way to have some more control over your generations without having to install and learn more advanced solutions like ControlNet. This type of LoRA can help you create dynamic and interesting scenes with just a few simple changes to the original prompt.
Clothing LoRa
Another useful model is clothing LoRA. As you'd expect, this type of LoRA model is designed to change the clothing and accessories on a person. With it, you can quickly and easily give any character new clothes, be they modern or historical in style.
What's great about these models is that they work with any type of character. You can apply a variety of different peoples' styles and designs with just one model! For example, if you want to create a scene with characters wearing traditional Chinese attire, simply apply your chosen clothing LoRA to your generation and voila - instant traditional Chinese costume!
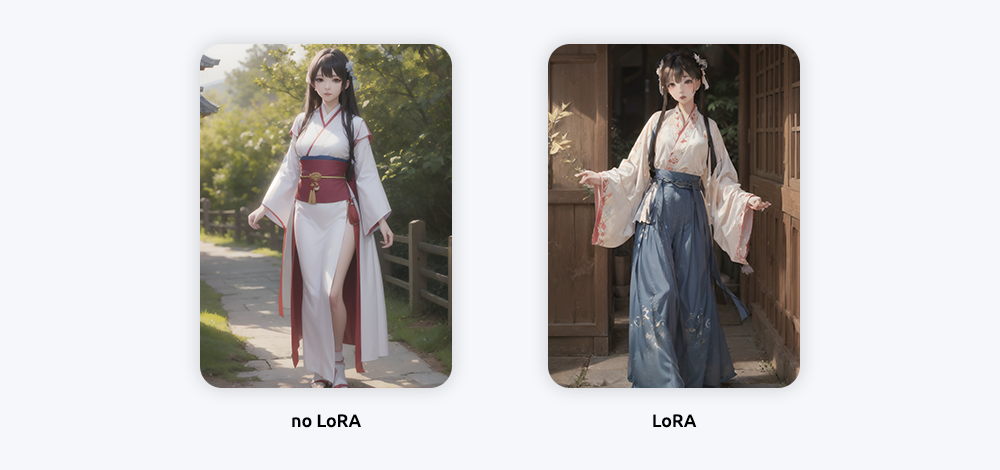
Oftentimes even if you clearly describe the attire of your character, Stable Diffusion may not do the best job at bringing your idea to life. However, with the help of a clothing LoRA, you can finetune the exact look of your characters and bring that extra bit of authenticity to your work.
Object LoRA
Last but not least, we have object LoRAs. This is a broad category of LoRA models that are used to generate objects such as furniture, plants or even vehicles. Of course the type of items you can create with these models depends on the specific model you're using and the prompt you provide.
However, this term also applies to LoRAs used to create more abstract objects, such as UI elements for games or websites. This can be incredibly useful for creating a more cohesive look and feel to your projects.
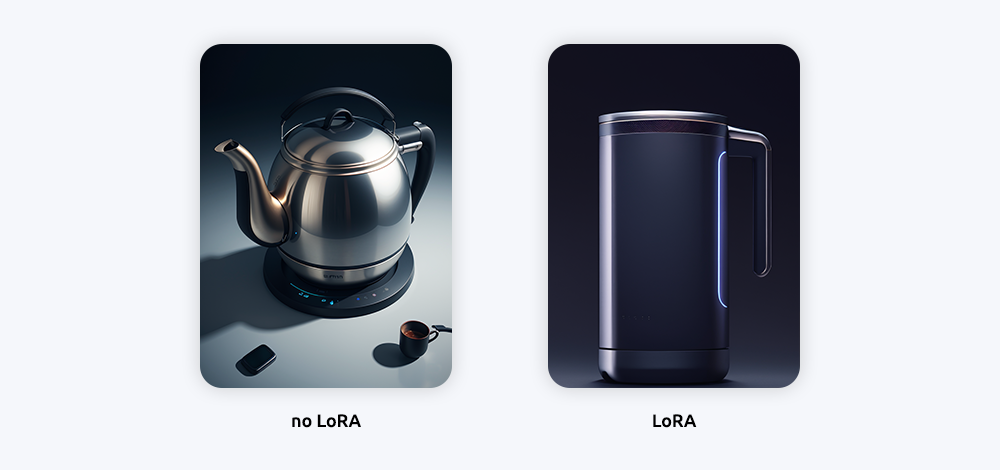
- Model used: Szechuan Special Sauce
- LoRA used: Product Design (Dark minimalism-eddiemauro)
- Prompt used: futuristic kettle, a computer rendering, minimalism, 4k
Object LoRAs are an invaluable tool for not only artists but also game developers, web designers, and other creative professionals who need to create assets efficiently. Being able to generate objects with custom designs gives you the freedom to experiment and explore different visuals until you find the perfect one for your project.
Where to Find and Download LoRA Models
LoRA models are available in various open-source repositories, including Civitai and Hugging Face. These models are free to use and can be easily downloaded in a few simple steps. The best thing about these models is their size - most LoRA models don't exceed a few megabytes, making them incredibly lightweight and easy to work with.
After downloading the model(s) you want to use, you'll have to install them to the correct folder. Depending on your setup, this can change. In this article, we're exploring the use of LoRA models with the Automatic1111 webUI, but you can research your platform for specific instructions on using LoRA models.
How to Install a LoRA Model Into Automatic1111
Before you can place your models into your webUI, you most likely need to install the LoRA extension itself regardless of what platform you use to generate your images. Here's how to install the extension for Automatic1111:
- First, launch the Automatic1111 web UI.
- Open the "Extensions" tab, and click on "Install from URL" from the available options.
- Paste the following link into the "URL for extension's git repository" input field, and then press the "Install" button: https://github.com/kohya-ss/sd-webui-additional-networks.git
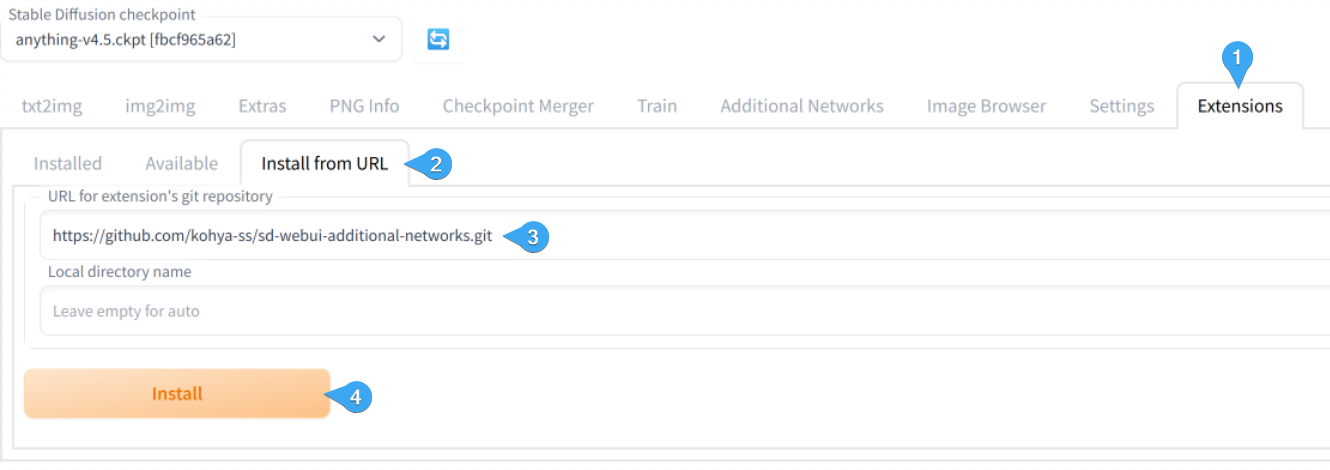
- Switch to the "Installed" tab, and click on the "Apply and restart UI" button. Now, wait for the Automatic1111 web UI to restart.

- After performing these steps, you should notice some new subfolders in your "models" folder. These models will store your LoRAs. However, you need to configure this folder so that the Automatic1111 web UI can read it.
- Open the "Settings" tab, and switch to the "Additional Networks" tab. Locate the "Extra paths to scan for LoRA models" input field and paste in the correct folder. You'll find it in the "stable-diffusion-webui/models/Lora" directory.
- After inputting the correct, full path to your LoRA folder, click "Apply settings."
This takes care of installing the LoRA extension, however, it's not enough to start generating images just yet. You need to install your actual LoRA models to the correct folder as well. To do that, grab the downloaded LoRA file and place it in your "stable-diffusion-webui/models/Lora" folder.
How to Use LoRA Models in Automatic1111
Once the LoRA model you want to use is installed, you can start creating images with it.
- Launch the Automatic1111 web UI and select your desired checkpoint model. Some LoRAs require a specific checkpoint to be used; always check the description and instructions of your LoRAs.
- Type in your prompt. Make sure to include the LoRA's trigger word if it has one. The creator will usually put this word in the description, or you can find it in the "Trigger Words" parameter on Civitai.
- Click on the "Additional Networks" icon under the "Generate" button, and switch to the “Lora” tab. Here, click on the Lora you want to use to insert it into your prompt.
- If needed, change the weight of the LoRA by modifying the default "1" to a lower or higher number. For example, some LoRA will work better on a weight like "0.6" or "1.2" depending on how it was trained, and what kind of results you're looking for.
- Finish configuring your generation settings, and click the "Generate" button.
You should notice that the LoRA was applied to your generated image, allowing you to work with more specific and unique concepts. The time and effort you have to put into configuring your LoRAs is well worth it; the results can be stunning!
ConclusionLoRA models are a great way to add more detail and accuracy to AI-generated images. With just a few simple steps, you can start incorporating these models into your Automatic1111 workflow, giving you access to a whole new world of possibilities for your projects. We recommend keeping an eye out for the latest releases, as there are always new and interesting models being added to the platform. Happy creating!